Kayak Construction
Building A Skin-On-Frame Kayak
Created July 10, 2011
Modified September 13, 2011
Updated with beginning of kayak build June 4, 2014
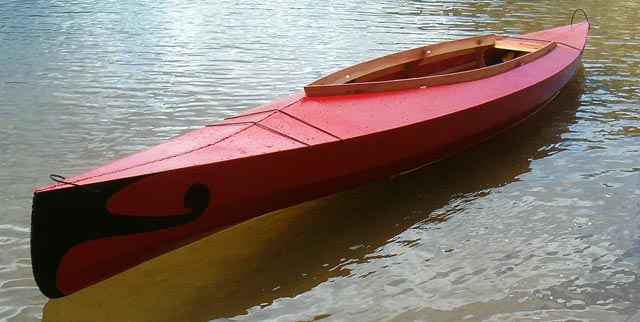
This is what a Chuckanut 15 skin-on-frame kayak looks like when someone who knows what they are doing builds one. I fell in love with the design, one of Dave Gentry's, and after viewing Andrew Linn's build of one at the Toledo Boathouse I knew I would have to give it a try. I decided to build a pair of Chuckanut 12s for Jay and I, and I've promised another for Bethany (probably a 10). I'll build the two 12s together. This webpage will attempt to document the build.
 This is what a well-built Chuckanut 10 looks like. Really makes you want to climb in and go for a paddle, doesn't it? Our good friends Kyle and Jennifer live in Anacortes, not far from Chuckanut Bay in Washington, so this kayak and all that it represents are even closer to our hearts than just the thought of paddling the waters of the Pacific Northwest.
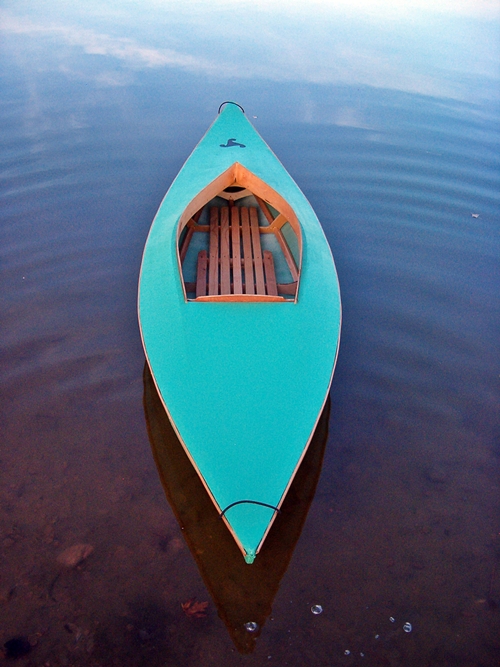 Another view of the Chuckanut 10, showing the simple but beautiful woodwork in the frames, stringers, and floorboards as a contrast to the fabric skin and the simple, Inuit-inspired lines. She's not a hunter with lean and lanky lines and a tight cockpit... she's got a broader beam and roomy cockpit and she's made for enjoying the inland waters of our PacNW country in comfort and with speed and stability.
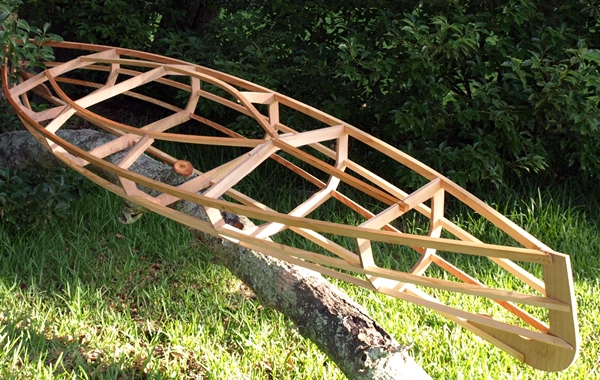 Now what could be simpler than this for a frame? Synthetic sinew-lashed stringers on a few simple frames, wood is all from the Pacific Northwest, and the lines are clean and display the stability of the kayak. The heat-tautened polyester fabric skin seen in the other photos brings out the lines of this beautiful kayak while still respecting the strength of the frames and skeleton, doesn't it?
So now the build begins! I've drawn up the frames in CAD for plotting out onto paper and then for transfer to plywood, which is the first step.
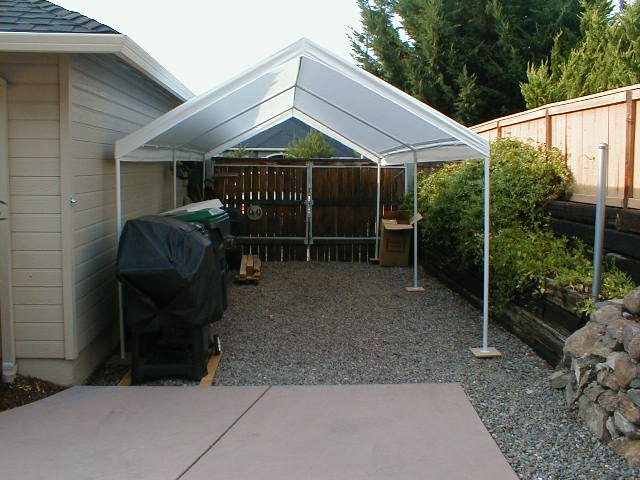 I don't really have a shop yet, and there's no room in the garage, so I decided to buy a simple outdoor shelter to put on the side of the house. It doesn't look like a proper workshop, but it will just have to do! I also bought the drop-down sides for the shelter, but the weather is still nice here so I'll leave the sides off for now. Let's build!
Follow my construction progress on each part of the construction here:
Wood Framing (New 06/04/14)